User Interface Guide
This guide explains how to use the user interface. For details about each module, see the Modules Guide.
Project
![]()
A project file stores all preset and sound data. Opening a project file restores all of that data. Project files use the .2020 extension.
Keyboard Interactions
| Modifier | Event | Description |
|---|---|---|
Command |
N |
Start a new project. |
Command |
S |
Save the project file. |
Command + Shift |
S |
Save the project file under a different name. |
Command |
O |
Open a project file. |
Undo and Redo
Use Undo and Redo from the Edit menu or with the keyboard shortcuts below.
Keyboard Interactions
| Modifier | Event | Description |
|---|---|---|
Command |
Z |
Undo the last change. |
Command + Shift |
Z |
Redo the last undone change. |
Context Menu
The Context Menu lets you control the module or UI element you right-click.
Modifiers
Some 2020 GUI controls use modifier combinations as gestures. Each modifier can be assigned to another key or mapped to MIDI or OSC.
| Modifier | Parameter | Default key mappings |
|---|---|---|
SHIFT |
/shift |
Shift |
FN1 |
/fn1 |
Alt / Control |
FN2 |
/fn2 |
Command |
They affect performance interactions only; application shortcuts such as Command + S still use physical keys.
Preset Selector
![]()
![]()
Some modules include a preset feature that lets you save and restore the state of all parameters in that module. These modules provide either 10 or 80 preset slots, which you can access using the keys shown in the UI. The Q W E R T Y U I O P keys are used for song presets, while the A S D F G H J K keys are used for pattern presets.
Mouse and Keyboard Interactions
| Modifier | Event | Description |
|---|---|---|
| - | Q W E R T Y U I O P |
Restore the preset at the beginning of the next bar. |
FN1 |
Q W E R T Y U I O P |
Restore the preset immediately. |
SHIFT |
Q W E R T Y U I O P |
Save the preset. |
| - | A S D F G H J K |
Restore the preset at the beginning of the next bar. |
FN1 |
A S D F G H J K |
Restore the preset immediately. |
SHIFT |
A S D F G H J K |
Save the preset. |
The preset keys respond with any combination of these modifiers held. FN2 is the exception, so application shortcuts such as Command + Q keep working. See Modifiers for how to reassign the modifiers themselves.
Disabling Preset Recall
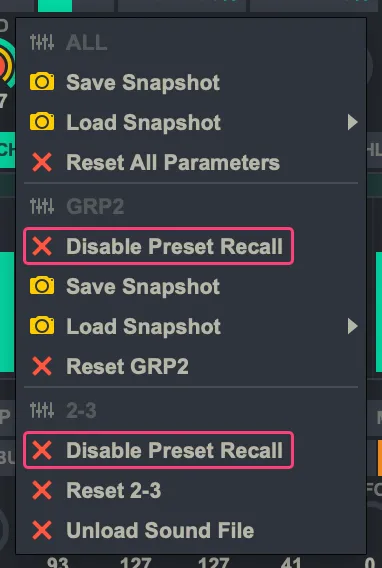
To disable preset recall, right-click and select Disable Preset Recall.
This is useful when you do not want a module to respond to preset changes.
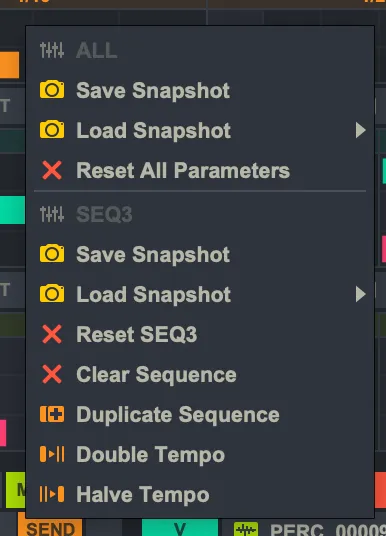
Snapshots
![]()
The Snapshots feature lets you save frequently used sounds and sequences for later reuse. You can save snapshots for the entire app or for individual modules that have a preset UI. Snapshots are saved from the context menu to ~/Music/2020/Snapshots.
Basic UI Components

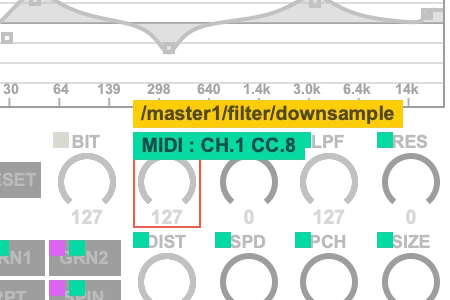
These basic UI components let you adjust parameter values and toggle switches on and off. Knobs in modules that can receive trigger events also include a randomize function. On randomizable knobs, the red line shows probability and the yellow line shows range.
Mouse and Keyboard Interactions
| Modifier | Event | Description |
|---|---|---|
| - | Double-click a component | Resets the value to its default. |
| - | Click a toggle component | Toggles the value on or off. |
| - | Drag a Knob or Number Box | Changes the value. |
SHIFT |
Drag a Knob or Number Box | Changes the value more quickly. |
| - | Drag a Slider | Changes the value. |
FN1 |
Drag a Randomizable Knob | Changes the randomization range. |
FN2 |
Drag a Randomizable Knob | Changes the randomization probability. |
The modifier keys used here can be reassigned, and can also be driven from a MIDI or OSC controller. See Modifiers.
Sound File Menu
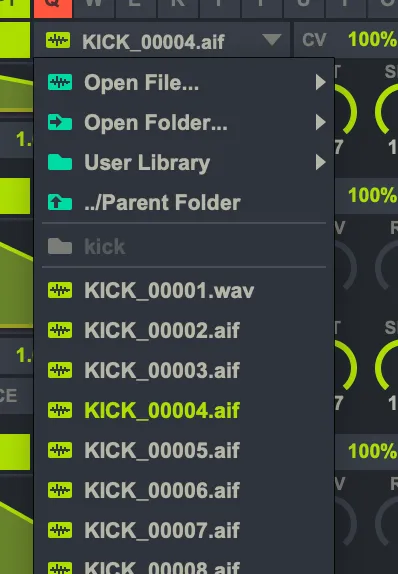
The Sound File Menu lets you browse and load sound files. Use the User Library menu to browse sound files and folders in ~/Music/2020/Sounds. You can also open sound files and folders by dragging and dropping them.
Transport Control
![]()
Use the transport controls to adjust BPM and swing, and to start or stop playback. Clicking the play button while playback is already running rewinds to the beginning of the bar. Clicking the stop button while already stopped cuts all audio. When syncing manually with other music, the tap tempo and BPM adjustment buttons are especially useful.
Keyboard interactions
| Modifier | Event | Description |
|---|---|---|
| - | SPACEBAR |
Toggle play/stop. |
| - | LEFT ARROW |
Temporarily decrease BPM. |
| - | RIGHT ARROW |
Temporarily increase BPM. |
Dejavu
![]()
Dejavu turns parameter randomizers into generative sequencers. It stores up to 32 generations of random values for all parameter randomizers, then recalls earlier values based on the selected probability and length.
For example, if you set the probability to 100% and the length to 8, the randomizer behaves like an 8-step sequencer that repeats values generated 8 steps earlier. At 0% probability, the sequence remains fully random. Values between 1% and 99% create a sequence that changes gradually over time. What makes this especially interesting is that the recalled steps advance independently of the BPM clock or bar length. Instead, they are triggered by the instrument itself. That means even with a length of 8, the number of beats in each loop depends on how often the module is triggered. As you adjust the Dejavu parameters, you can discover new ways to create build-ups and transitions in your music.
Adjust the DJV and LEN parameters on the right side of the clock module to control the global Dejavu settings.
You can also set them per module via OSC or MIDI using an address such as /group1/dejavu/prob.
Grid Sequencer
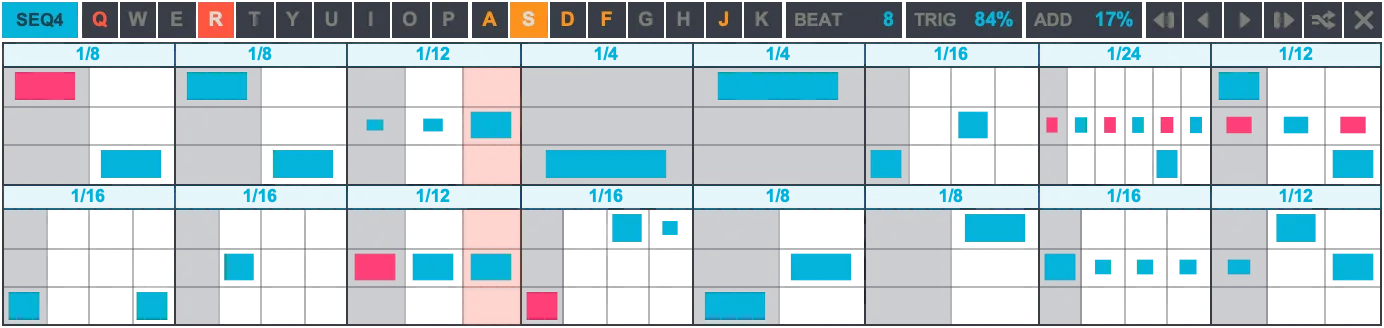
The Grid Sequencer lets you create and play trigger sequences. You can set the resolution for each beat and edit the sequence using the buttons in the upper-right corner.
Mouse Interactions
| Modifier | Event | Description |
|---|---|---|
| - | Click or drag over cells | Toggles triggers. |
FN2 |
Click or drag over cells | Toggles accents. |
SHIFT |
Drag over cells | Changes the volume sequence. |
FN1 |
Drag and drop | Copies the sequence one beat at a time. |
| - | Execute Duplicate Sequence from the context menu |
Duplicates the current sequence to the selected end position. |
| - | Execute Double Tempo from the context menu |
Rearranges the grid to play the current sequence at double speed. |
| - | Execute Halve Tempo from the context menu |
Rearranges the grid to play the current sequence at half speed. |
Envelope

You can edit the envelope to shape parameters such as volume, pitch, and granular settings over time. If you are using an FM synthesizer or granular sampler, you can select and edit individual envelopes from multiple available envelopes using the algorithm selector or tabs. You can also randomize the positions of the envelope points.
Mouse Interactions
| Modifier | Event | Description |
|---|---|---|
| - | Drag a point | Moves the envelope point. |
| - | Drag a line between points up or down | Changes the curve of the envelope. |
FN1 |
Drag a point | Changes the range of randomization. |
FN2 |
Mouse over | Switches to the pitch envelope. |
Audio Bus
![]()
The output of an instrument module can be sent to any bus. For example, if you want to send it directly to the mixer, enable BUS1. If you want to process it with an FX module, enable FX2.
FX Patcher
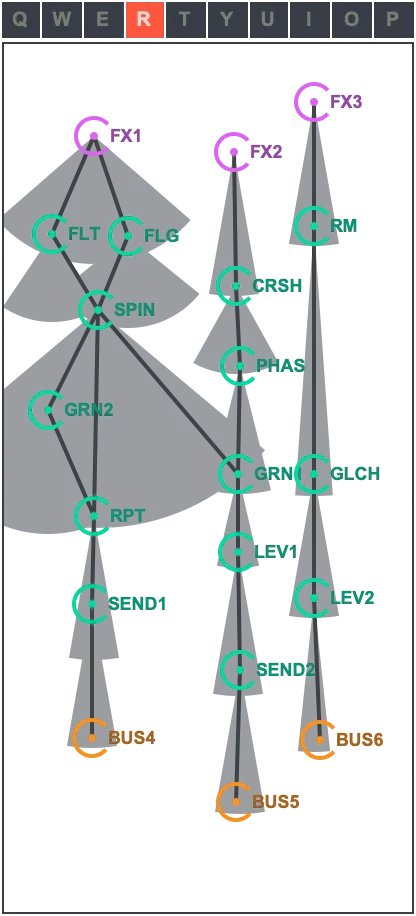
You can freely connect modules represented as nodes. The circular arc shown on each node indicates the range within which it can connect to another node.
Mouse Interactions
| Modifier | Event | Description |
|---|---|---|
| - | Drag a node | Moves the node. |
FN1 |
Drag a node | Changes the connection range of the node. |
Trigger Events (CV)
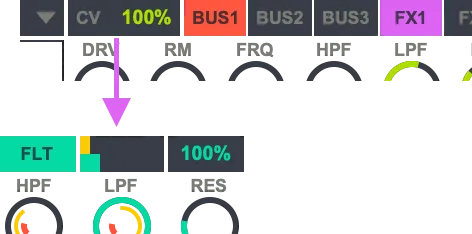
When you enable and trigger an FX bus (FX1, FX2, or FX3), you can control the connected FX module in the FX patcher with a CV signal. In the FX module, if the CV signal exceeds the threshold, parameter randomization is triggered and the LFO is reset. If the CV signal falls below the threshold, it is not passed on to the next module. CV signals are also summed together.
CV signals are intended for internal use only and cannot be used to drive hardware synthesizers.
Mute
![]()
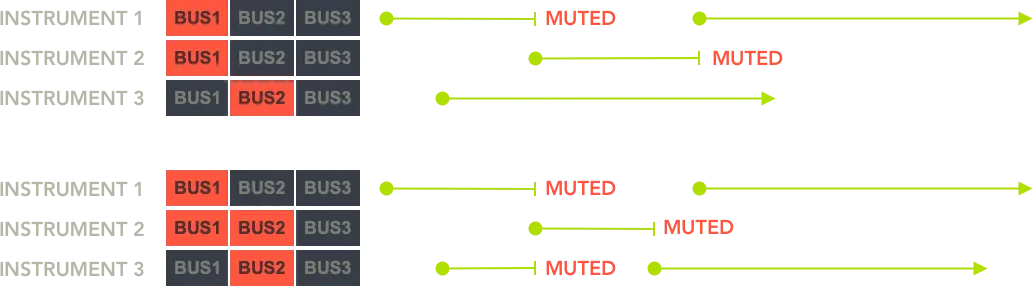
When MUTE GRP is enabled, instruments in the same group that use the same buses will mute one another when triggered.
FM Algorithm

You can switch algorithms and choose which of operators 1 to 3 are shown in the editor.
Mouse Interactions
| Modifier | Event | Description |
|---|---|---|
| - | Click an operator | Displays the clicked operator in the editor. |
| - | Click outside of operators | Switches algorithms. |
Equalizer

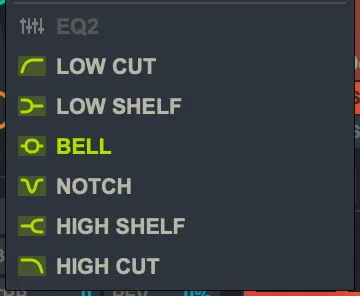
You can adjust EQ points by moving them in any direction. Dragging left or right changes the frequency, while dragging up or down changes the gain. Changing the Q value adjusts the sharpness of the EQ curve.
Mouse Interactions
| Modifier | Event | Description |
|---|---|---|
| - | Drag a point | Moves the EQ point. |
FN1 |
Drag a point | Changes the Q value of the EQ point. |
| - | Right-click on a point and select a filter type from the context menu | Selects the EQ type. |
Learn Mode
In Learn mode, you can assign MIDI controllers or keys to the selected parameter. However, keys that are already assigned globally, such as those used for presets or instruments, cannot be reassigned here.
To remove a mapping, press the Delete key while Learn mode is active.
Keyboard Interactions
| Modifier | Event | Description |
|---|---|---|
FN2 |
L |
Toggle Learn mode. |
Audio Settings
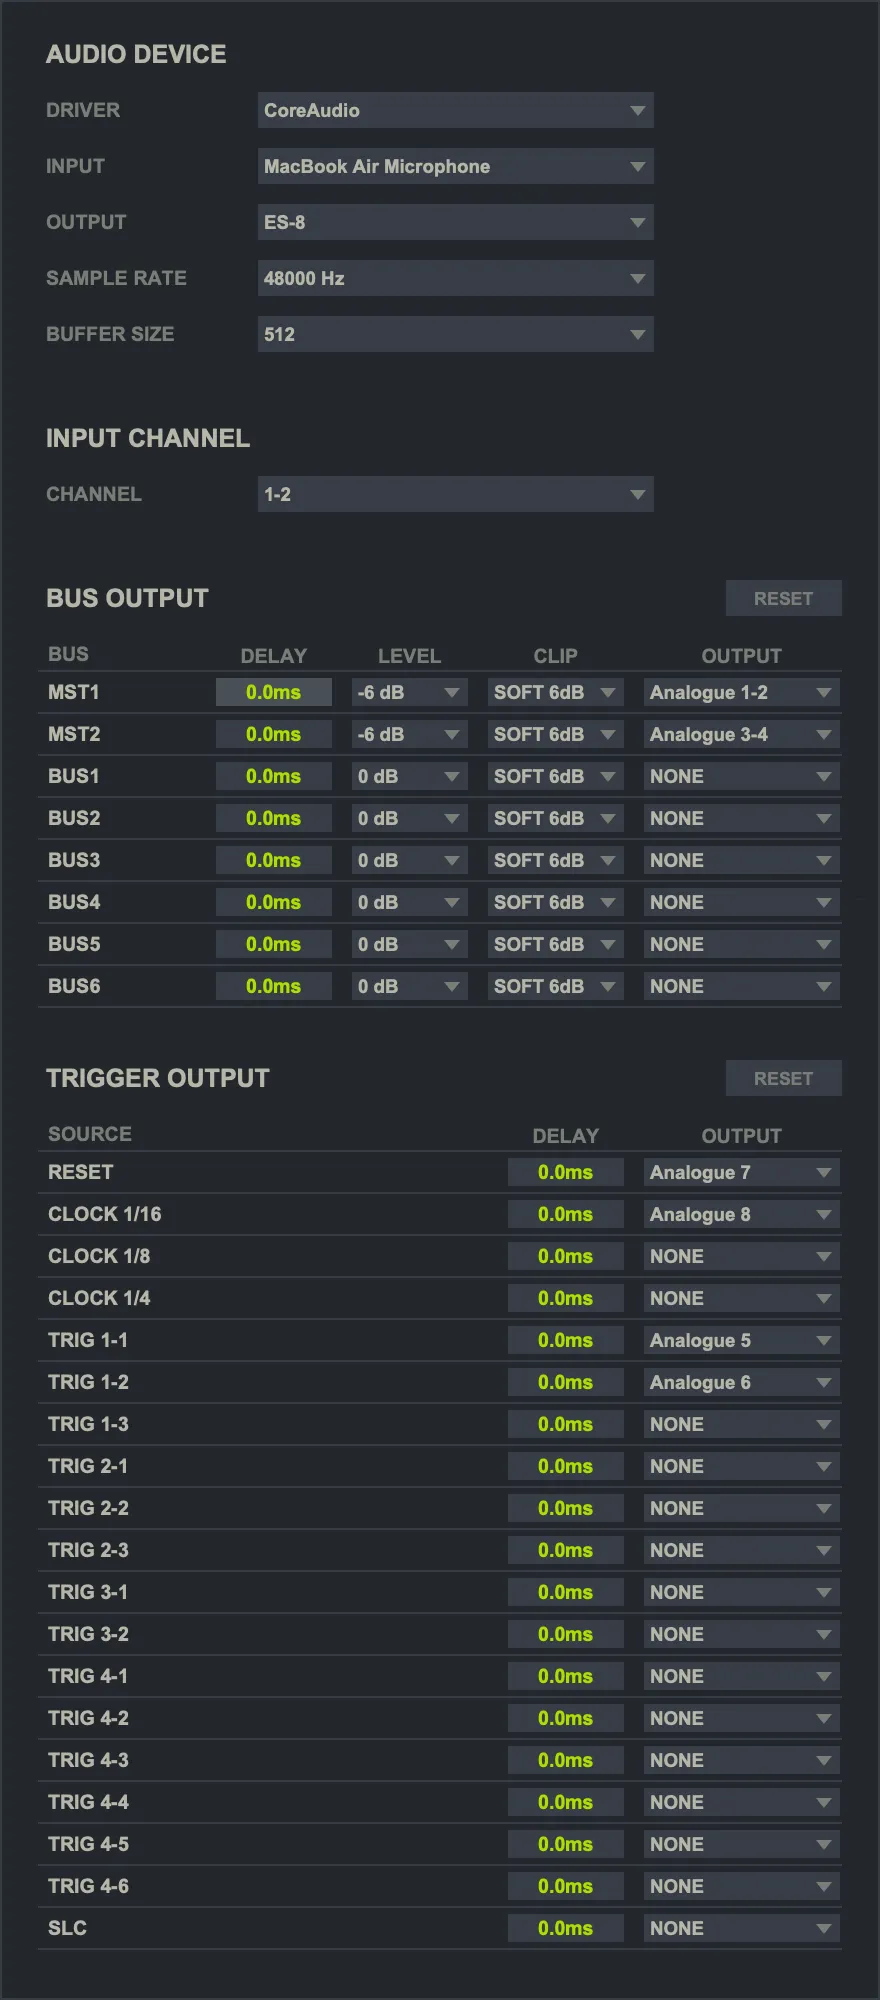
Audio Device
DRIVER: Selects the active audio driver type provided by the operating system or audio interface.INPUT: Selects the hardware input device used by 2020.OUTPUT: Selects the audio output device.SAMPLE RATE: Selects the sample rate supported by the current device.BUFFER SIZE: Selects the audio buffer size supported by the current device.
Changing the output device also reloads the routing saved for that specific device. Routing is stored separately for each output device.
Input Channel
CHANNEL: Selects which stereo input pair from the chosen hardware input device is used as 2020’s input.
Input device selection and input channel selection are both hardware-input settings. Link Audio input selection is configured separately in the Ableton Link preferences.
Bus Output
The bus router assigns the main mix and internal buses to physical output pairs on the current audio interface.
DELAY: Adds output delay in milliseconds. Range:0to100 ms.LEVEL: Sets the bus output gain. Available values:6 dB,0 dB,-6 dB,-12 dB,-24 dB.CLIP: Selects the clipping mode. Available values:SOFT 6dB,SOFT 0dB,CLIP 0dB.OUTPUT: Assigns the bus to a physical stereo output pair on the selected audio device, orNONE.
Trigger Output
The trigger router sends clock and trigger pulses to individual physical output channels.
DELAY: Adds trigger delay in milliseconds. Range:0to100 ms.OUTPUT: Assigns the trigger source to a physical output channel on the selected audio device, orNONE.
MIDI Settings
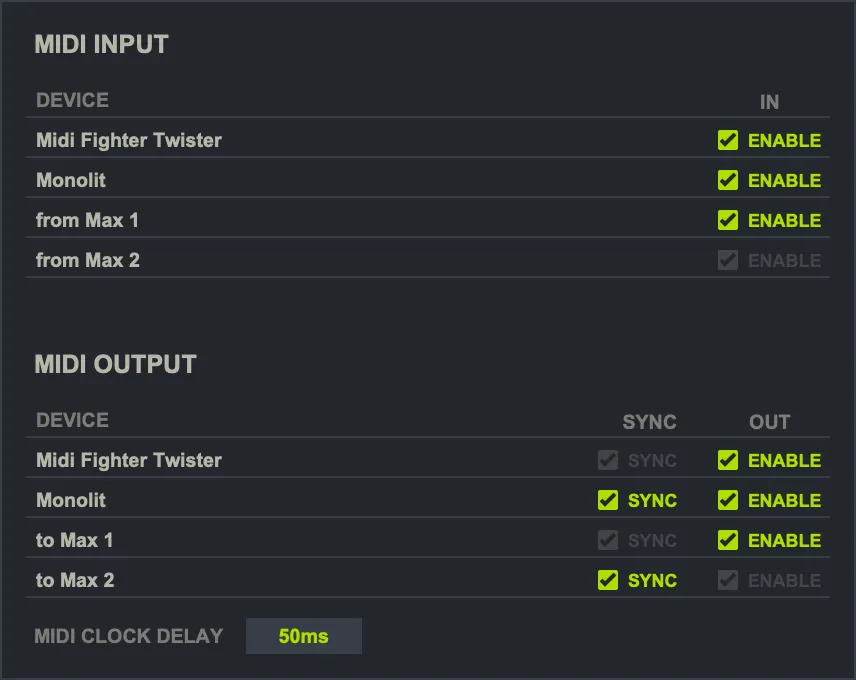
MIDI Input
IN: Enables or disables MIDI input from that device.
MIDI Output
SYNC: Sends MIDI clock sync to that device.OUT: Sends parameter/output data to that device.MIDI CLOCK DELAY: Adds delay to outgoing MIDI clock timing. Range:0to100 ms.
Ableton Link
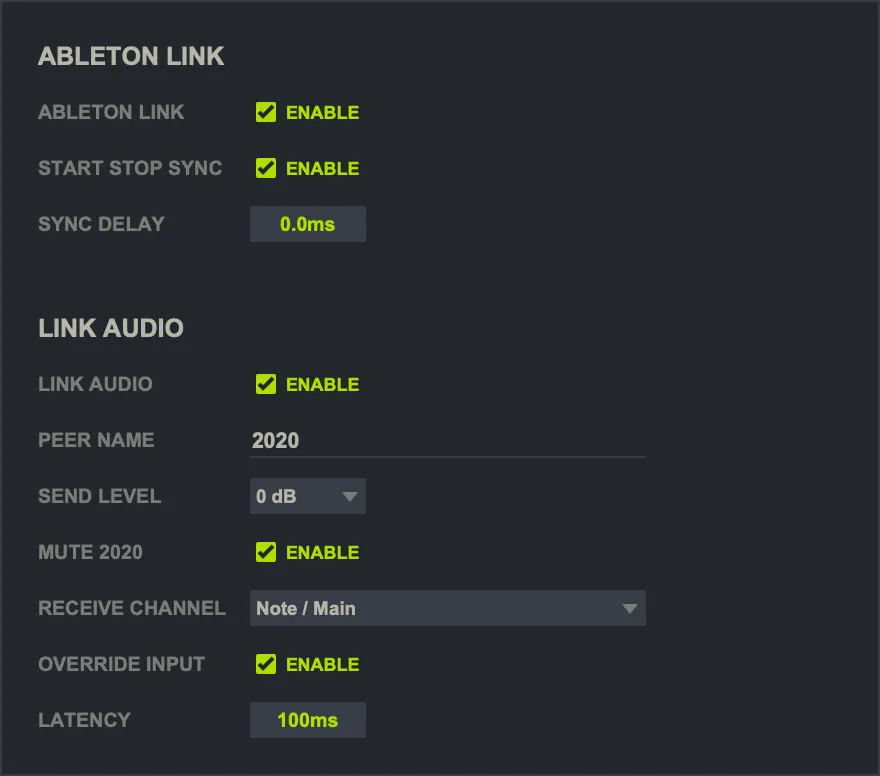 Ableton Link provides tight clock synchronization between devices on the same network.
You can enable or disable Ableton Link from the Preferences window or from the Options menu.
Ableton Link provides tight clock synchronization between devices on the same network.
You can enable or disable Ableton Link from the Preferences window or from the Options menu.
Ableton Link
ABLETON LINK: Enables or disables Link clock synchronization.START STOP SYNC: Enables or disables Link start/stop synchronization.SYNC DELAY: Offsets Link timing in milliseconds. Range:-300to300 ms.
Link Audio
LINK AUDIO: Enables or disables Link Audio send and receive.PEER NAME: Sets the name shown to other Link Audio peers.SEND LEVEL: Sets the send level for Link Audio.MUTE 2020: Mutes 2020’s local audio-bus output while Link Audio send remains enabled.RECEIVE CHANNEL: Selects a Link Audio peer and channel to receive from.OVERRIDE INPUT: Replaces the hardware input with the selected Link Audio input whenLINK AUDIOis enabled and the selected receive channel is currently available.LATENCY: Sets the Link Audio receive latency in milliseconds.
OSC Settings
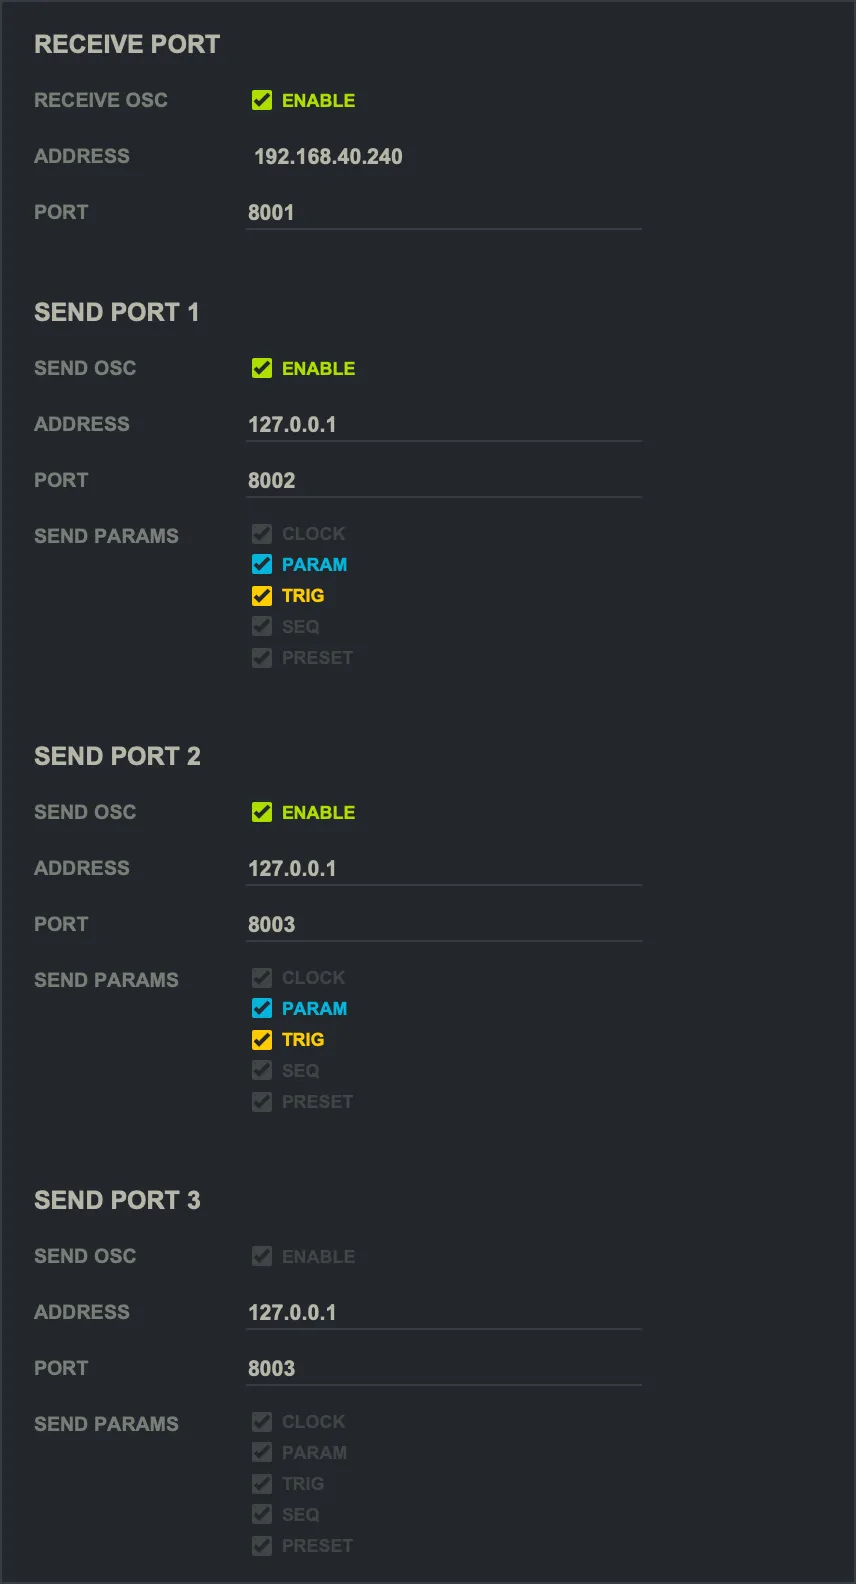
Receive Port
RECEIVE OSC: Enables or disables incoming OSC messages.ADDRESS: Shows the current local network address used for OSC reception. This is display-only.PORT: Sets the UDP port number used to receive OSC.
Send Ports 1-3
Each send port has the same controls:
SEND OSC: Enables or disables OSC transmission for that port.ADDRESS: Destination IP address or host.PORT: Destination UDP port.
Each send port can also filter which message categories are transmitted:
CLOCKPARAMTRIGSEQUENCERPRESET
Enable only the categories you want to send to the destination assigned to that port.
Recording Settings
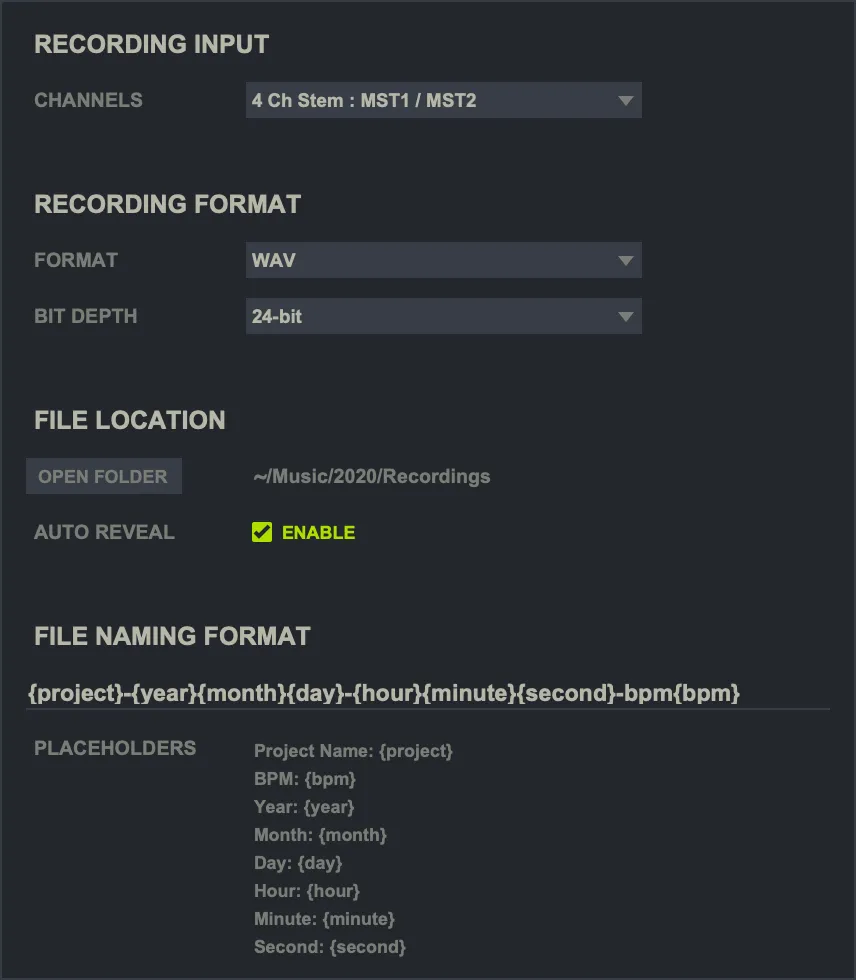
Recording Input
CHANNELS: Selects the recording channel set.
Available channel sets:
2 Ch Mix : OUT1 + OUT2: Records the main stereo output.4 Ch Stem : MST1 / MST2: Records two stereo master stems.12 Ch Stem : BUS1 / BUS2 / BUS3 / BUS4 / BUS5 / BUS6: Records six stereo bus stems.
Recording Format
FORMAT: Selects the file format. Available values:WAV,AIFF.BIT DEPTH: Selects the bit depth supported by the selected format.
If you want to record stems and fully remix them in another DAW, try the WAV 32-bit format. It preserves signals above 0 dB correctly. Be careful not to damage your equipment or your hearing.
File Location
OPEN FOLDER: Opens the recordings folder in the OS file browser.- Storage path:
~/Music/2020/Recordings AUTO REVEAL: Automatically reveals the saved recording after recording finishes.
File Naming Format
The file naming field controls the filename pattern used for generated recordings.
Default pattern:
{project}-{year}{month}{day}-{hour}{minute}{second}-bpm{bpm}Available placeholders:
{project}: Project name{bpm}: BPM value{year}: Four-digit year{month}: Two-digit month{day}: Two-digit day{hour}: Two-digit hour{minute}: Two-digit minute{second}: Two-digit second
Color Themes
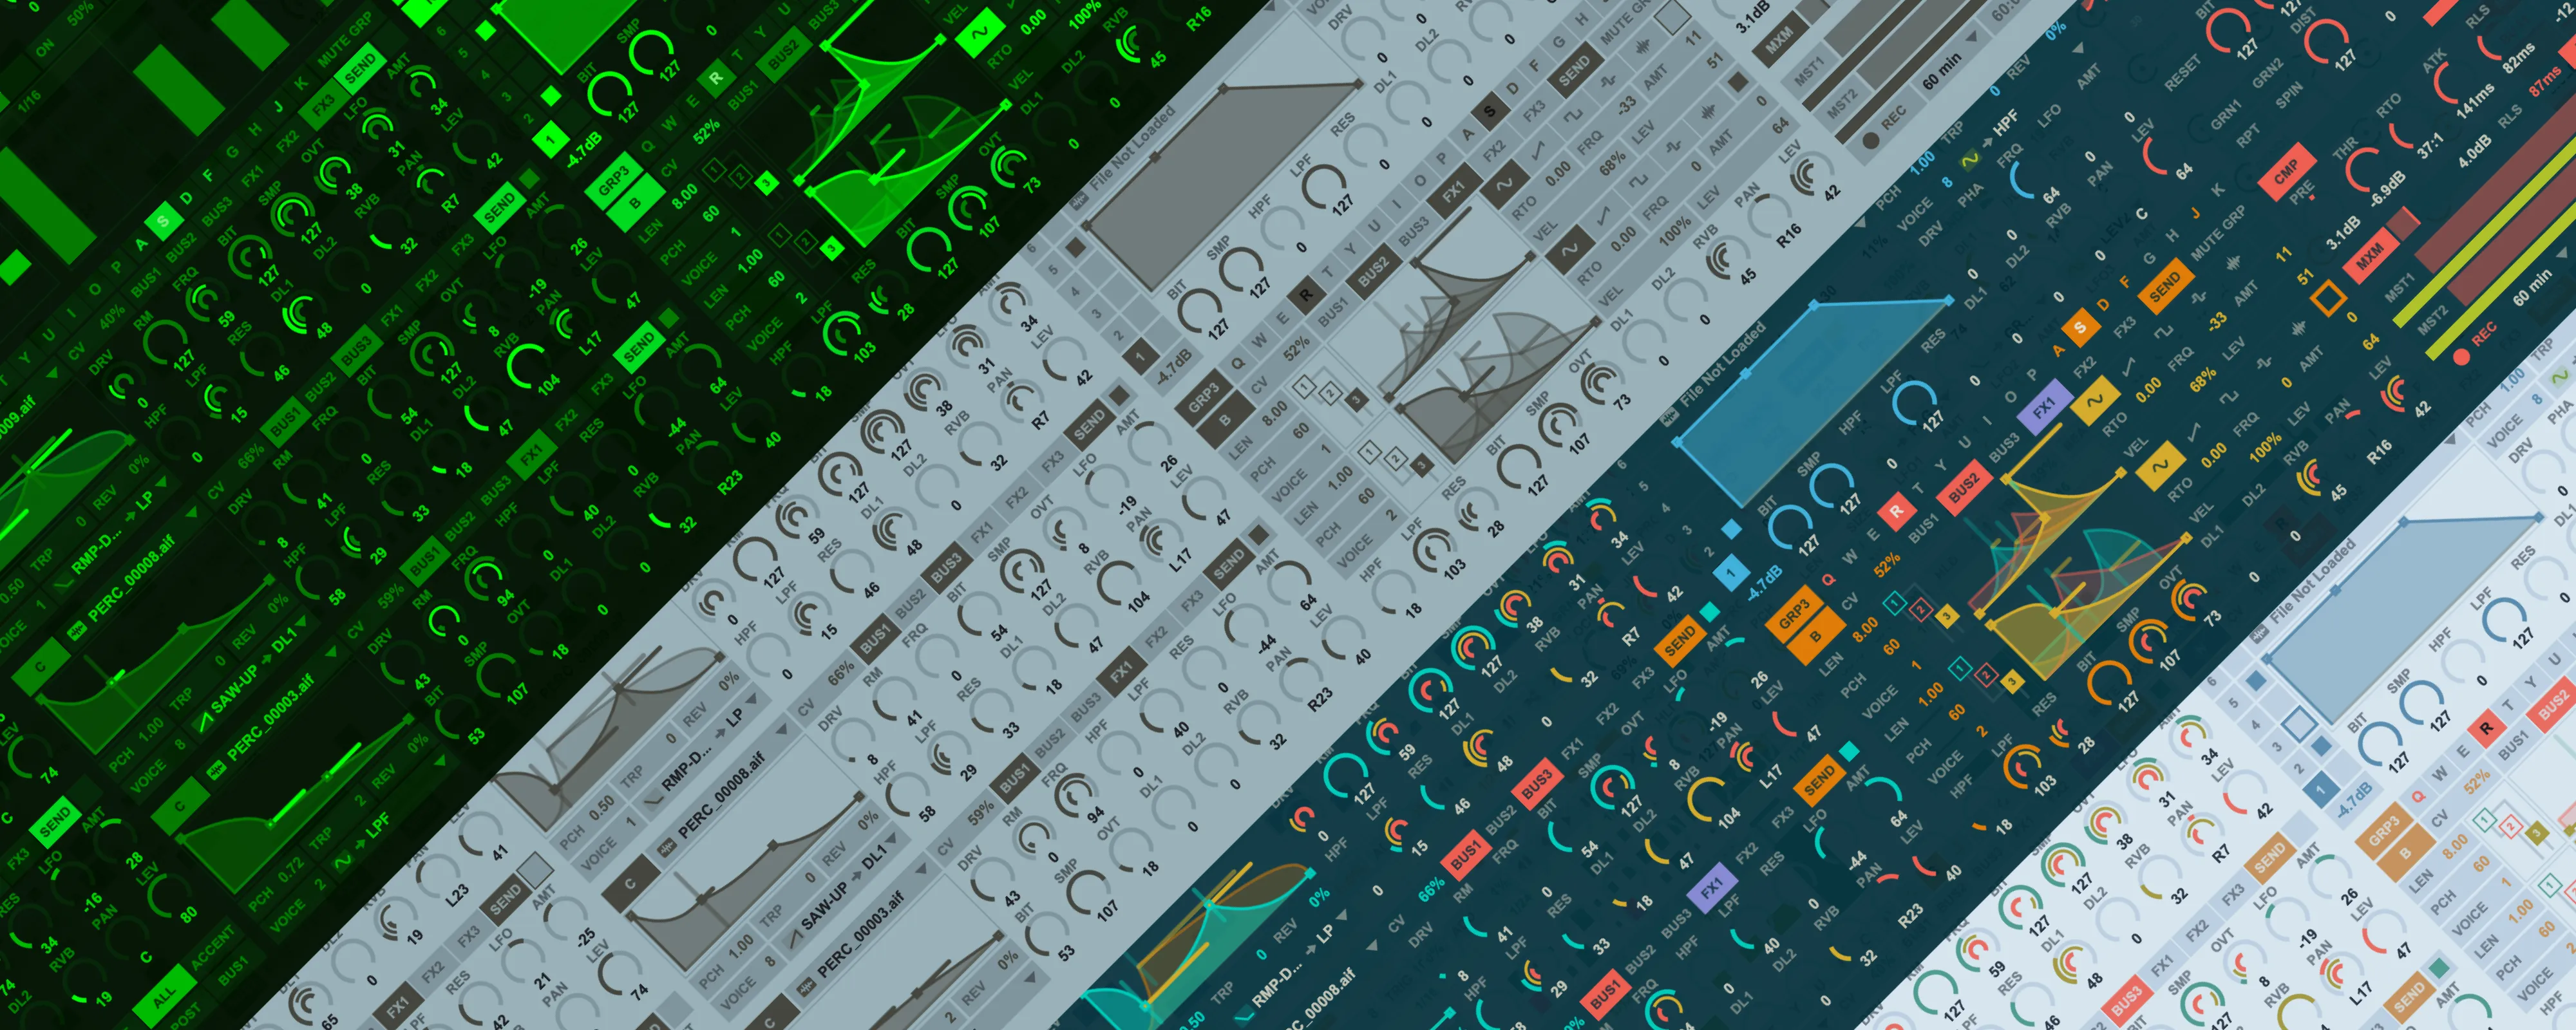
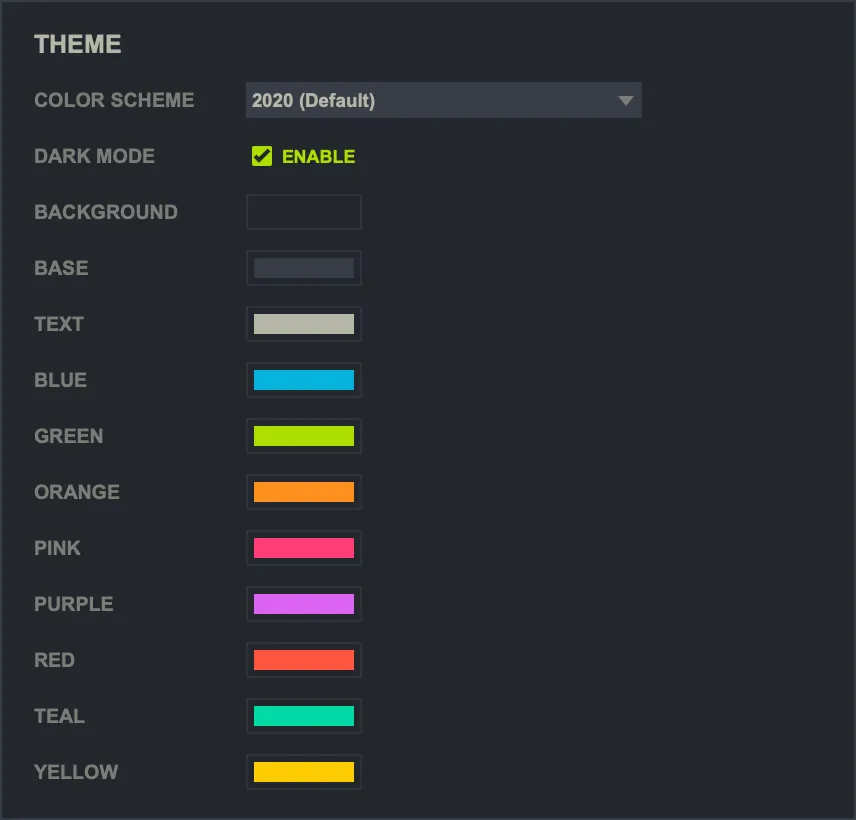
You can customize the UI color scheme. There are 11 colors you can set: Background, Base, Text, Blue, Green, Orange, Pink, Purple, Red, Teal, and Yellow. You can also switch between dark mode and light mode. Feel free to experiment with your own color combinations and share them if you create a theme you like.
Configuring the Keyboard Layout
The song preset keys, the pattern preset keys, and the instrument enable keys follow the layout of your keyboard. They are bound by physical position — song presets across the top letter row, pattern presets across the home row, instrument enables across the bottom row, each from left to right — so on an AZERTY keyboard the first song preset is A rather than Q.
These keys are resolved once and then saved to mappings.config. Changing your input source afterwards does not move them. If you want 2020 to follow a new layout, quit the app, delete mappings.config, and start it again. A layout that cannot produce a distinct character for every position, such as a Cyrillic or Greek one, keeps the QWERTY defaults instead of moving only part of a row.
You can also assign any key yourself by editing mappings.config.
- Quit 2020.
- Choose
Go>Go to Folderfrom the Finder menu. - Type
~/Library/Containers/com.dubrussell.2020beatmachine/Data/Library/Application Support/com.dubrussell.2020beatmachine/and press Enter. - Edit
mappings.configwith any text editor. - Open 2020 again after editing.
The default key mapping on a QWERTY keyboard looks like this:
  <key key="shift" parameter="/shift"/>
  <key key="option" parameter="/fn1"/>
  <key key="ctrl" parameter="/fn1"/>
  <key key="command" parameter="/fn2"/>
  <key key="q" parameter="/preset/q"/>
  <key key="w" parameter="/preset/w"/>
  <key key="e" parameter="/preset/e"/>
  <key key="r" parameter="/preset/r"/>
  <key key="t" parameter="/preset/t"/>
  <key key="y" parameter="/preset/y"/>
  <key key="u" parameter="/preset/u"/>
  <key key="i" parameter="/preset/i"/>
  <key key="o" parameter="/preset/o"/>
  <key key="p" parameter="/preset/p"/>
  <key key="a" parameter="/preset/a"/>
  <key key="s" parameter="/preset/s"/>
  <key key="d" parameter="/preset/d"/>
  <key key="f" parameter="/preset/f"/>
  <key key="g" parameter="/preset/g"/>
  <key key="h" parameter="/preset/h"/>
  <key key="j" parameter="/preset/j"/>
  <key key="k" parameter="/preset/k"/>
  <key key="z" parameter="/group1/1/enable"/>
  <key key="x" parameter="/group1/2/enable"/>
  <key key="x" parameter="/group1/3/enable"/>
  <key key="c" parameter="/group2/1/enable"/>
  <key key="c" parameter="/group2/2/enable"/>
  <key key="v" parameter="/group2/3/enable"/>
  <key key="b" parameter="/group3/enable"/>
  <key key="n" parameter="/group4/enable"/>
  <key key="m" parameter="/slicer/enable"/>
  <key key="spacebar" parameter="/clock/play"/>
  <key key="cursor left" parameter="/clock/bpm/slower"/>
  <key key="cursor right" parameter="/clock/bpm/faster"/>
You can change the key="q" part to assign the action to a different key.
To remove a key assignment, change it to key="".